
The cold and the snow mean the end of gardening as we know it until mud season comes. However, if you are fortunate to have some woodland on your property, it’s an excellent time to create paths and turn your paths into trails.
What’s the difference between a path and a trail?
There are many meanings to the words path and trail, even mathematical ones. Some people consider the two words synonyms. But I like the distinction which I found here, which is that a path is made naturally by people or animals walking over it, and a trail is an improved path. It may be improved just for walking, or may be widened for horses, bicycles, or vehicles. I’m only going to be talking about improving it for walking, because we don’t have horses or off-road vehicles and bicycles.
Where should the trail go?
At our former home, my kids created the paths by dint of going where they wanted to go, over and over. For the most part, they followed the path of least resistance, which was either a deer trail or where water flowed during spring melt. At our current home, my children–most of whom are now adults–quickly discovered the much more extensive trails our neighbors had made on their properties. So the only path-of-least-resistance my children created is one to connect with the larger neighborhood-wide trail system.
Dress for success and stock your kit bag
If you’re not that familiar with the woods on your property, creating a path is probably the best place to start, and winter is the best time to start. But before I talk about that, you need some basic tools and equipment, most of which–as a gardener–you already have. For either new paths or established paths, you need to mark them. Get flagging tape. It helps if you have more than one color of flagging tape. I use one color to mark the trail, another color to mark notable plants or features, and another to mark trees or shrubs that need to be removed.
Of course you need appropriate clothing and footwear for current conditions. The clothing is similar to what you would wear for winter hiking or cross-country skiing–several layers instead of one heavy coat–but you might consider insulated chore gloves instead of your usual hand warmers. Depending on how much snow is on the ground, hiking boots might suffice, but if the snow is deep and you’re up for it, snow shoes work well, too. Just keep in mind that your outermost layer can get snagged by thorns or hitchhiking seeds, so you might not want to wear that expensive ski jacket you just got.
As for tools, when you’re just starting out creating paths, a pair of hand pruners (secateurs) will be all you need, just to get brambles and branches out of your way. Eventually you will want some loppers as well, and possibly a chain saw. (If you’re like me, you will need a chain saw operator as well.)
Two ways to make a path
When we first moved here, I knew almost immediately that I wanted to create a viewing spot and path along the creek, the area I call the Secret Garden. As I wrote previously, that involved cutting down two trees as well as a lot of pruning and lopping. You might already know of some special places on your land–an abandoned house foundation, a burbling spring, a hushed clearing.
If you haven’t already worn a path to those places, you’ll need to think about the best way to get there. Are there other spots you want to see along the way? Are there obstacles to be avoided or (in the case of water) bridged? Do you really want to go straight up the hill? Are you going to go straight there and return on the same path, or walk in a loop and come back to your starting point from a different way?
On a (relatively) nice day, go out with your flagging tape and your pruners in your pockets and figure out how to get there, using flagging tape to mark your path. I tie the flagging tape around the tree, with the knot on the side of the tree I want the path to be on. I used to just tie a double knot, but now I prefer the same kind of knot that I use to tie my shoes, because then the tape can easily be removed later by tugging one strand. (The tree will keep on growing, and eventually the tape becomes too tight, and if it hasn’t degraded and fallen off by then, you’ll want to cut it off.)
I try to tie another piece of flagging tape while the first one is still in sight behind me, so that when I walk the path again, I should always be able to see the next marker up ahead. If I think a marker is going to be hard to spot, I tie a long strand hanging from a branch, so it moves in the wind and is easier to notice. Consider this initial marking your “first draft.” You probably won’t find the best way on the first try. And if you’ve created a looping path, you’ll need to walk it in the opposite direction to make sure you can see the markers going both ways.
The second way to make a path is what my kids did at the old house: follow the path of least resistance. If, like me, you have deer traversing your land on a regular basis, start following their paths through the snow. You can always just turn around and go back the way you came if they take you across property lines or you just don’t know where you are.
Tracking deer is what I’ve done on the southern end of our property, which I’ve dubbed Wild Apple Woods. There were already some things that we had worn a path to–a hammock and a swing–but for the most part I just followed the tracks the deer had made, with a bit of modification where they went over onto the neighbor’s land and I didn’t. The first time or two I just walked it, and later I marked it with tape.
Walk your path in every season
You might create your path in winter, but it’s still a “rough draft” until you’ve walked it in every season. You’ll discover that a certain low spot stays muddy for a long time, underbrush grows thickly and needs to be cleared, and hey–now that the trees are leafed out, I can’t see many of those markers. Sometimes I re-route around muddy areas. Other times one well-placed stepping stone is all that’s needed. And I continue to follow the same rule about being able to see the previous marker. I stop and add a new marker as soon as I can’t see the previous one–which means I add a lot of new markers. Hopefully you will also discover new delights, such as a patch of trilliums you never knew were there.
Getting from path to trail
Before improving your path, consider what your goals are. Do you want two people to be able to walk side-by-side? How smooth do you want the walking surface? There are a lot of factors you could consider, and the trail building book mentioned below will help you think about them. My goals were pretty simple: I didn’t want anything snagging my clothes or whacking me in the face. A little mud was okay, but not if I sank to my ankles. And tree roots and protruding rocks would be the walker’s job to look out for. I wasn’t going to remove them.
When I am actively improving a trail, I carry a pair of loppers and a pair of rose gloves in addition to the hand pruners and flagging tape. The rose gloves don’t fit in my pocket and the loppers get tiresome to carry, so I usually put everything in some kind of tote that has a cross-body strap, so both hands remain free. I cut branches that obstruct the path, but I generally find it’s better to pull brambles and invasive roses out by the roots, which is why I bring the rose gloves along. You’d be surprised at what can be pulled up during mud season when the ground is thoroughly saturated, and plants that are uprooted don’t resprout.
Before you break out your loppers and pruners–or the chain saw–you might want to read the Appalachian Mountain Club’s Complete Guide to Trail Building and Maintenance. I didn’t have access to it when I made my first paths, but it’s come in handy as I’ve been thinking about the improvements I want. The book goes into a whole lot of detail.

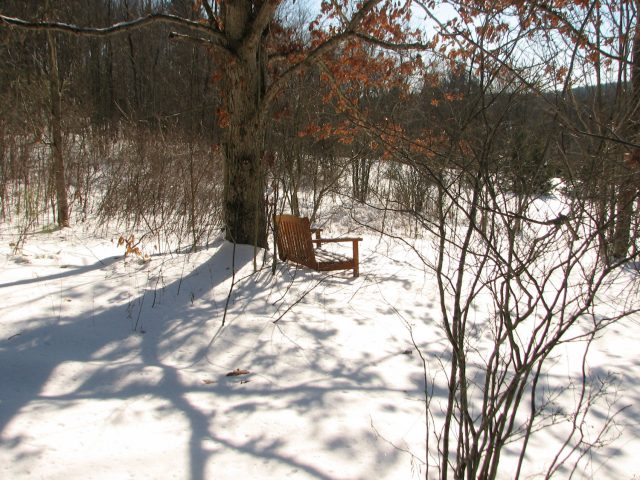
A bench with a view is a good reason to take a winter walk.
There’s more to making a trail than clearing physical obstructions. Consider also what you might add. I’ve already touched on the possibility of a bridge. A particularly scenic spot calls for a bench. You might want to add native plants where you think they will thrive. If, like us, you spot a tree with a fairly perpendicular substantial branch, why not hang a swing from it? Hmm. Perhaps, like me, you are starting to think of your trail as another type of garden? A garden writ large, with a different expectation of maintenance, but a garden nonetheless. Best of all, a garden you can work on in the winter, when gardening “as we know it” has ended.


Kathy, your advice on trail building is really helpful. We have lots of trails in the woods but I wasn’t involved in choosing the routes for most of them. This summer I decided we needed to change the route for one trail… wish I had read your advice before I started!
Happy New Year to you.
I laughed when you said you use deer trails as a guide. I don’t have a big enough property to include trails, but my route to the compost pile, through my back yard, is a minefield of deer poop, requiring eyes on the ground before every step.
I want to move now and find a home with enough property to include a few trails!
Growing up there were nearby woods which we blazed trails throughout. I guess we were the kids following our own paths of least resistance to our friend’s houses and biking trails. It was actually harder to not leave a trail, such as when we were trying to keep our secret fort locations hidden 🙂
I’m so happy I stumbled across your site. After reading, I love the idea of making a trail around our property, thank you for the inspiration.
This post reminds me of a landscape designer here opened his garden for charity a couple of years ago. He has a wooded area with trails through it. One of the most charming aspects of it was a swing, a one seater, that you could swing out over a ravine. I felt like a child again sitting in that swing looking at the tree tops and down into the ravine. It was magical.
I found this so informative since it is outside the realm of my experience. Just what I love to learn about…other people’s very different experiences.