
I woke up on the wrong side of the bed today. A good remedy when I feel snappish and sorry for myself is to cross something off from my never-ending to-do list–preferably a project that has been hanging over my head for a while. That way, I get a morale boost from getting it done, and I can’t berate myself at the end of the day for not being productive. Today’s morale-boosting project was winter-sowing.
Winter-sowing is the easiest way to cold-stratify seeds. Instead of putting seeds in a sealed plastic bag with some moist potting soil and sticking them in the refrigerator for a specified number of weeks, and then potting them up and growing them under lights, you pot them up right from the get-go and put them outside, using the cold temps of winter to your advantage.
Kevin Lee Jacobs and many others use gallon milk or water jugs as mini-greenhouses in which they start their seeds. I have done that in the past, and will probably do so again in the future, but for my mental health I needed to sow seeds today and I hadn’t had the forethought to set aside some cleaned milk jugs.
I will let you in on a little secret: just about anything in gardening can be done successfully more than one way. Typically, experienced gardeners do things a certain way because that’s how they learned to do it–and it worked–so why change it? With some people, it can become close to a religion: their way is the right way, the best way, and everyone should do it their way–but unless they have scientific experiments to back it up, it’s just their strongly-held conviction.
I tell you this because the way I am about to show you was how I learned to sow seeds to grow indoors many years ago, and I think this method works pretty well when you have small quantities of seed. But it’s certainly not the only way to winter-sow.
Nan Ondra is the reason I have small quantities of seed for many interesting plants. She is an amazing plantswoman, a prolific writer, and a generous soul. Through her blog, Hayefield, she has given away seeds every fall where time allows, and I have taken advantage of her generosity.

A selection of seeds from Hayefield. A card depicting her pet alpacas has my seed order written on the back.
1) Select your seeds
I sort through my seeds, deciding which ones are suitable for winter-sowing. Any winter-hardy perennial is ideal. Cool weather annuals are good, too, but I often scatter-sow them where I want them to grow in the garden. They usually don’t need as long a cooling period, so if I want to winter-sow them, I save them until last, in case I run out of time. I decided on fourteen packets of seed, and I almost quit right there. When you’re tired and irritated, everything seems like a huge project and too much work. But I was firm with myself. If I only did one thing today, it would be getting these seeds sown.
2) Gather your supplies
Potting soil. It should be a freely draining mix. One thing I did remember to do ahead is bring in frozen potting soil from the garden shed and let it thaw down in the basement. Tip: the big plastic tub that some brands of kitty litter come in is an ideal container for a household quantity of potting soil. But my bin was just about empty.
Pots.

I have accumulated a lot of these small square pots over the years.
Labels and an ultra-fine waterproof marker.

I make labels out of plastic yogurt containers.
Plastic clamshell containers.

I had a few of these tucked away in my seed starting area in the basement.
Grit.
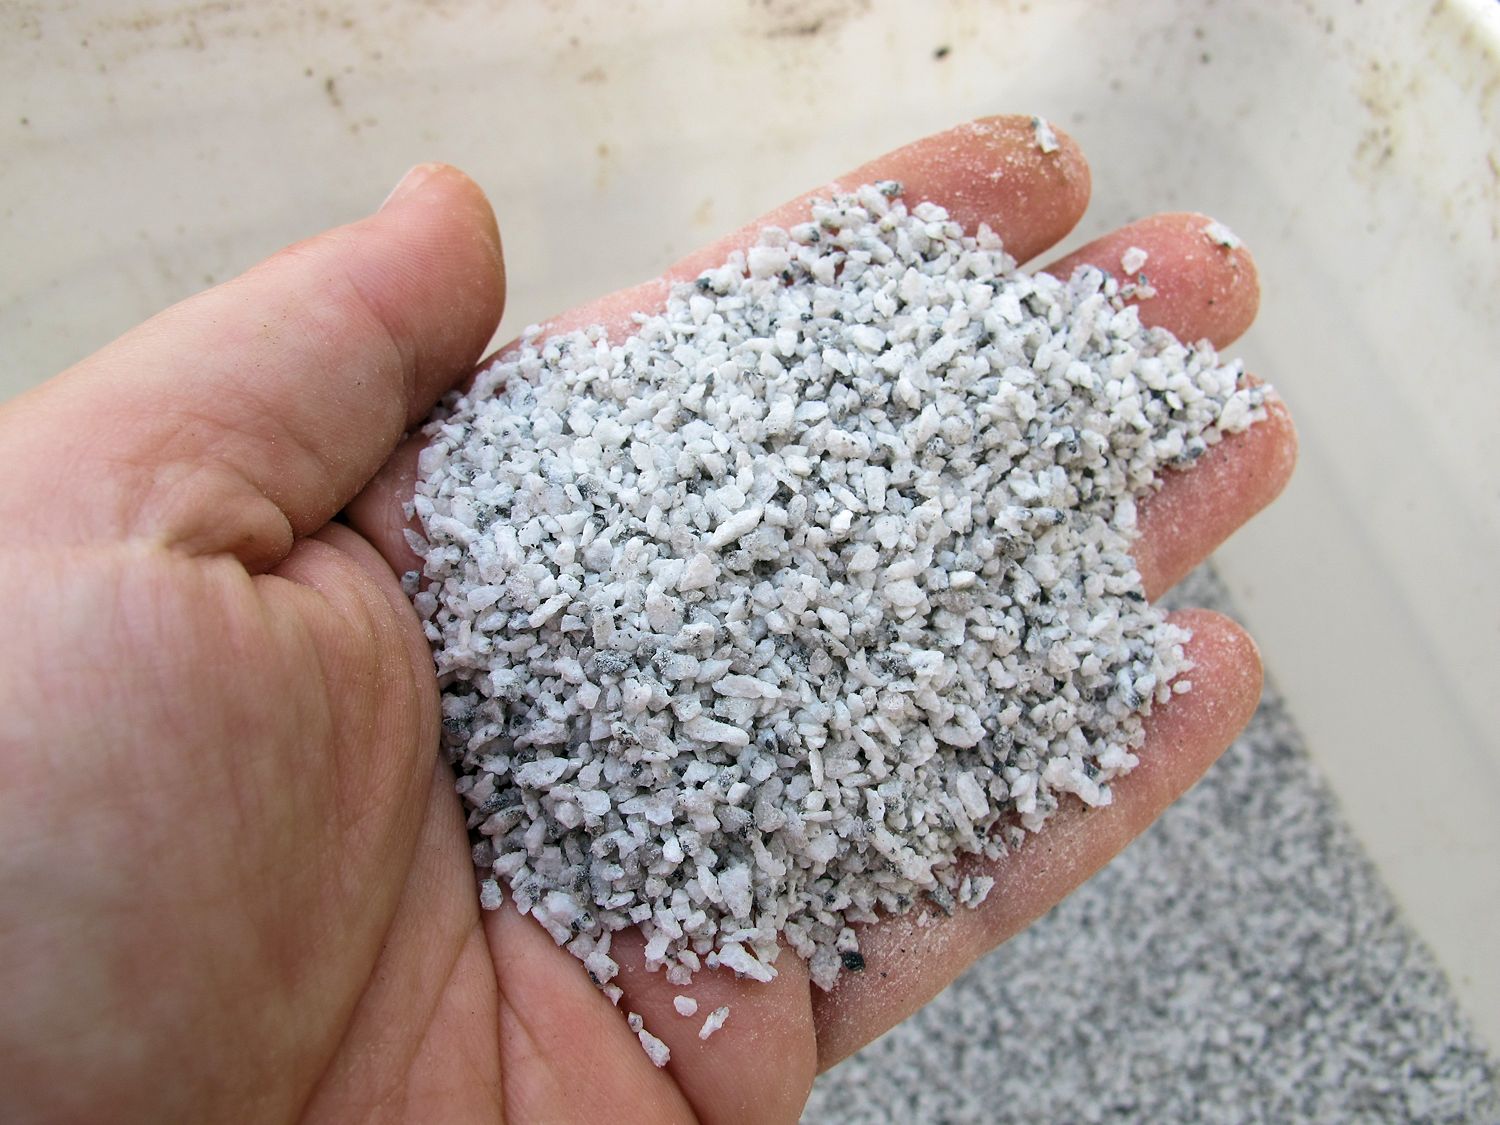
This finer sized grit is called starter grit at feed stores.
I made several trips down to the basement because I kept forgetting things. The temptation to call myself an idiot was strong, but I resisted. When I’m already in a bad mood, it’s easy to find fault with everything I do, but I just focused on getting this project done.
3) Set up your workflow
I find if I do certain things “all in one go” it lets me concentrate without interruption on the pleasure of actually sowing the seeds. I lay down newspaper or some other disposable protection for my work surface–it makes clean-up a breeze. I write the names of all the seeds on their respective labels before I begin. Then it won’t matter if I get my fingers dirty or damp as I’m working, and I can just grab the appropriate label. Finally, I fill the pots with soil and tamp it down a bit, so there’s a smooth surface to receive the seeds.

Leave some room at the top of each container.
Time to sow!
It’s time to get the seeds out of their packets and onto the surface of the soil. This is when the therapy happens. I pick a label and insert it in the side of a pre-filled pot. I open the corresponding seed packet and pour the seed into the fold of a small greeting card I save for this purpose. Then, using the tip of a knife or a pencil point, I push each seed off the card and onto the surface of the soil.

I guide each seed into place.

With only nine large seeds, it’s pretty easy to distribute them evenly.
Finally I cover the seeds with grit.

The grit helps keep the seeds in place.
When I was done sowing all the seeds, I set the containers in a pan of water so the potting mix would get moistened from the bottom up. Then I put the containers into the clamshells and brought them outside to the picnic table.

The seeds will sprout when they are ready. Sowing them has already done me good.
By entering the small world of seeds, I got a better perspective on my own minor troubles. Observing the seeds was thought-provoking, sowing them was soothing, and by doing so, the promise of spring was made more real. Gardening brings you back to the long view of things: the seasons change, and change again, and winter is but one of those seasons.
The tagline for this blog is Hardy plants for hardy souls. A plant is considered hardy because it can survive winter. A hardy soul is a person who can survive winter, and winter-sowing seeds is one way I nurture hardiness in myself.


Please visit my new blog: https://thecaffeinatedgardener.wordpress.com/ I post about so many tips and tricks for new gardeners.
It was wise to use yogurt boxes for labels! I have always clipped up the top of the milk cartons as I sow the seeds in and use for labels, but they disintegrate after a while.
Great post. I used to sit around patiently waiting for the weather to start warming up before I got back in the garden but there are many things that can be done in winter to keep the green thumb happy 🙂
Kathy, I think it would be a good idea if you would contemplate repurposing this inspiring winter sowing hacks into an ebook. Just thinking.
I loved the piece. Great job Kathy
Thank you Kathy, take advantage of your way to landing!
Will have to give this a try myself! Amazing what you can do with a bit of out of the box thinking.
Tony
I have done some wintersowing every year for the past few years, and I am definitely going to try it this way. I have so many of those four-inch pots around, and it just seems like a much simpler way to handle it. I also cut up my old yogurt containers to use as plant markers — such a great tip.
Love this, Kathy – I am going to get some of the earlier garden seeds planted over the next few weeks- it does make winter seem shorter!
Fantastic blog overall and great tips in this post. I would have never thought to use cut up yogurt containers as waterproof labels great way to recycle and make something new. I also thing the grit idea to keep the soil in place is smart in the past I used hay straw to keep things in place but it is a little hit or miss on the success rate of keeping things in place. Thank you again.
I’ve done wintersowing here near Seattle, and it works just great. My problem now is that I’ve been living in this townhouse for so long that my four small flower beds are full of fully-grown perennials now. I think I need to move and start over!
Oh, Kathy you almost, almost make me wish I stuck out winters up North for my hardy soul and just so I could winter sow! I love the grit tip! I did winter sow once – in milk jugs and to my surprise, it actually worked. I happen to like your set up better. Now you can check everyday, every hour, every minute to see if a seed has sprouted – well, that’s what I would do. This post was so much fun and I can’t wait to see the flowers.
Kathy, nice article about wintersowing! I did it last year for sweet peas and that was the first time I had ever had any luck in growing them. Hope the rest of winter is warm and short for you! -Beth
I am trying the clamshell potting idea this year as well. I am hoping to propagate some of my hard to find woodland natives.
I tried this for the first time last year. I was surprised how well it worked. You don’t need to worry about hardening off, or the plants getting enough light, or even damping off. I am definitely trying it again this year.
Great post!~~Dee
Thanks for showing an alternative to using milk jugs. Milk is now sold in white plastic jugs here in the Rochester area and I’m not sure they would allow enough light to get to the seeds. I’ve read through all of Kevin Jacobs’ posts about winter sowing and really want to try it.
How do you keep your clamshell boxes from blowing away in the first big wind?
Pat, I just took a good hard look at one of our milk jugs. I haven’t been paying attention, and ours are now solid white, too. They wouldn’t get enough light, I agree. If you have read Kevin’s posts, you have seen what his jugs look like. They look translucent to me. But he isn’t using milk jugs. They are Polish Spring water jugs. (In one of his posts you can read the label.) So even if the milk jugs are solid white in your area, you may be able to find other gallon jugs that work. Or collect a lot more clamshells. (Another commenter, Deborah Banks, plants directly in the clamshells.) As for not blowing away in the wind: the grit I use does add some weight. But I think what helps most is that the picnic table is in an ell, where a screened-in porch is taking the brunt of the wind. If I had to use a windy location, I would get a net such as is used to hold down a load in a pickup truck, and drape it over the clamshells and weight down the net. Or perhaps put gravel in the bottom of each clamshell.
I recently moved to UK, but still go back to Romania and enjoy some family gardening (unfortunately in London we don’t live in a house). We do the sowing as a tradition a bit further on – end of February, begging of March, when there is more sun to help the growth. I was wondering are the temperature fluctuations an impediment? Last week in my village the temperatures were well under – 10 degrees Celsius and now it’s 15 (I even sow some flying wild ducks).
Clear Gardener, the technique I am talking about is intended to break the dormancy of seeds by exposing them to below freezing temperatures. You are trying to duplicate the conditions these seeds would find in the wild. There would certainly be temperature fluctuations. There would even be the occasional warm day. But if 10C (50F) is the typical temperature for this time of year for you–that is too warm for this technique. (We occasionally get a warm day in the middle of winter, but then the temps go back to below 0C.) However, I know some people start all their seeds outdoors–even the tender ones–instead of growing them indoors using lights. They start them in some sort of container and just bring them in when nights are too cold, and bring them out again each morning. I wouldn’t call that winter sowing because it is not depending on the cold, but taking advantage of the stronger sunlight.
It has been gray and rainy for as long as I can remember her, I’m going to give this a try.
Charlie, how much longer will you have frost? I’m not sure you have enough cold left in your winter to stratify perennials, but cold-hardy annuals and biennials would probably still work. And where you are, you could try more tender stuff.
Great post – I always wanted to try this!
Start saving clamshells or plastic jugs today. Most seeds need only 6 to 8 weeks of stratification, so you’ve still got time. Do it!
I need to get busy on my sowing also. I usually plant right in those plastic ‘clam shell’ boxes, instead of in the little plastic pots. Only difference is that you have to first put a lot of drainage holes in the bottom and along the lower sides of the clam shell, and even a few holes in the top. The easy way I do this is standing at the gas stove in the kitchen with one blade from a pair of cheap kitchen scissors. Heat the blade, burn 2 or 3 holes, repeat until your husband complains about the god-awful smell. Finish your hole burning the next day while he’s at work… Last year I then put a small piece of burlap in the box to keep the soil from washing out. After sowing, shut the lid and take outside to the picnic table. Oh and remember to put a label in the box of what is in it, or number it and write the corresponding label info on the sheet of paper you keep inside.
Good tips, Deborah. With a lot of my seeds, I had such a small quantity that a whole clamshell for one packet would have been overkill.
Thanks – I had gone through seeds today and have several packets in the refrig. but I like this idea. I need to gather some supplies but will do this soon.
It’s much more satisfying to have them sprout outdoors at their appointed time. And it’s not hard to do.
Thanks for this how to, Kathy. I have been wanting to do this, and will plan accordingly for next winter!
Donna, there’s still time to do it this winter, especially in your climate, where the last frost won’t be until May sometime.
A wonderful reminder to care for our selves…and a productive way at that!