If you don’t want to dig and you don’t want to pile, try this.
When I first started gardening, the “proper” way to prepare a garden bed was double digging. I wouldn’t recommend that for anything except really long-lived plants, like peonies and asparagus.
These days many people recommend lasagna gardening or something similar. I tried that, and it didn’t work too well for me. The biggest mistake I made was not making sure the bindweed was thoroughly dead before I laid down the cardboard and newspaper. I also didn’t pile up as much organic matter as I should have, due to not having enough around and not wanting to buy it. And thirdly, I didn’t want to wait for everything to rot and settle.
I Didn’t Want to Dig & I Didn’t Want to Pile
So I didn’t want to dig and I didn’t want to pile. Also I had read Jeff Lowenfel’s Teaming with Microbes and realized that the more you disturb the soil layers, the more you set back the microbes that are the real life force of soil fertility.
So I came up with a hybrid method, a compromise between ideal soil preparation and my limitations of time and money. (And space. Storing up enough newspaper to cover a new garden bed thickly requires storage space that other family members might prefer to put to other uses.)
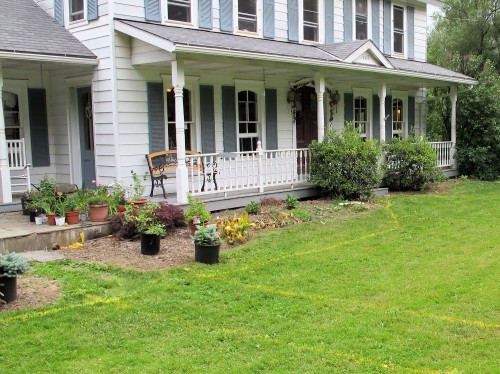
The first thing I do is mark the bed with landscape paint, which was discussed in the previous post.
Remove the Sod
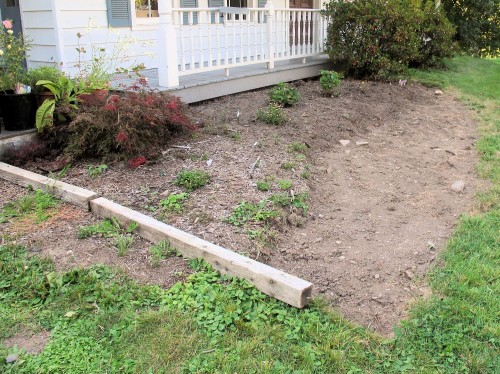
After that, I cut along the painted edge with a sharp spade. Then I find a teenage boy and hand him a mattock. I am not kidding you. I ask one of my strong sons to use a mattock and remove the sod. They learned from their father how to skim the sod off with shallow cuts, leaving as much soil behind as possible. The sod is used to fill bare or uneven spots in our lawn, used as fill, or thrown onto the compost pile.
Knowing that the most fertile soil is around the roots of the grass that was just removed, I used to pound the pieces of sod and shake out as much loose dirt as possible. And even after that, the soil level would still not be up to its previous level. I finally realized sod-pounding was not the best use of my time, so now I try to line up some organic matter to replace what was taken away–but not as much as you would need with the lasagna method.
Add Organic Matter
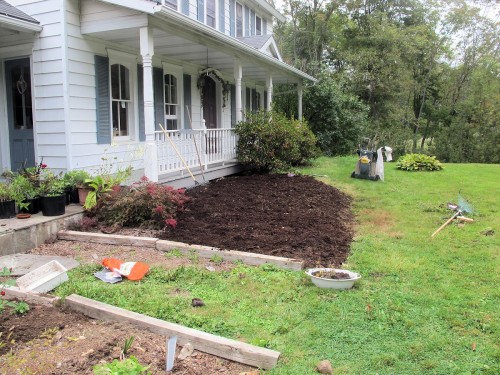
Since we’ve moved here, I’ve discovered a horse breeder a couple of miles away who sells well-rotted manure by the pickup truck load. He uses this little front-loader to toss and turn the pile frequently. I’m not sure if the pile generates enough heat to kill weed seeds, or the seeds sprout but then get killed by the disturbance, but I have had very little weeds come up from this soil amendment. Again with the help of family members, I shovel the well-rotted barn cleanings out of the back of the truck and onto the bed.
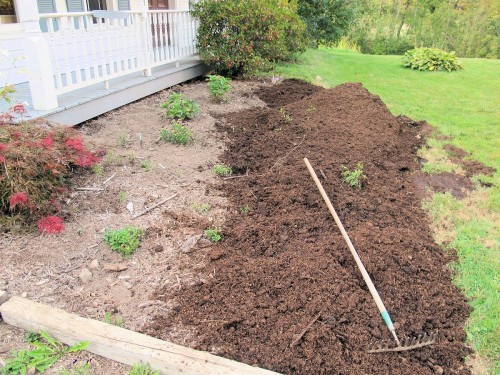
We just got done shoveling the manure out of the truck. Oops, it looks like I still need to remove some plants.
Don’t Dig It In!
Now here is where I depart from my previous practice. I used to dig all this good stuff into the native soil. I don’t do that anymore. I dig to the extent necessary to plant something, but I don’t uniformly dig through the whole bed. That’s my concession to what I learned from Mr. Lowenfels. The idea is to avoid disturbing the soil layers any more than you have to. And it is a heck of a lot less work and time.
Supposedly the earth worms will eventually incorporate the organic matter into the native soil. I haven’t seen that with my own two eyes. But the plants at the old house that were planted this way seemed to do fine. And really, it makes more sense to create a garden with plants that are adapted to the conditions you’ve got. If you have to heavily amend the soil and other conditions to make your plants happy, you’re making a lot of extra work for yourself. And it doesn’t stop with bed preparation. You’re going to have to keep babying them. Is the pleasure you get from those particular plants going to outweigh the extra effort, time, and expense? Only you can answer that question. Just don’t grow something because everyone else is growing it. End of rant.
Rake It & Make It Look Good
After I rake everything smooth, I’m ready to plant. This is the process I went through with all the beds I’ve created since I’ve moved here. Ideally, once they are planted, all the bare soil is covered with mulch. For the most part that hasn’t happened, but the weed problem hasn’t been too bad because that manure has been well-composted. I really think in order for a garden to thrive, more organic matter should be added every year, but I don’t manage it on every bed every year. That’s the goal I aim for, though.
This post is part of a continuing series chronicling how I am designing new gardens at my new (to me) house. All the posts are gathered under the category New House, New Gardens. Here is an overview and map of the environs.


Hi! I know this post is very old, but I just wanted to add how amazing your blog is 🙂 I just found it all the way from Denmark and I love this post on garden bed improvements – I will do the same with the new garden beds I am preparing this Fall. I have just ovetaken my grandmothers old garden in Denmark after having had a small, small garden in Holland and there is a lot of work ahead here, but with this easy way, I am far more optimistic 🙂 Thanks!
Thank you, Sandie, for taking the time to comment. Good luck with your grandmother’s garden. I hope you discover lots of treasures!
This is good information. But, I find removing sod too much work for me as I am a petite woman and do not have any strong teenage son 🙂 — well, I have my husband but convincing him to move the sod is another job :-P. So, if it is a small area, I try to follow exactly what you have described above — I just invented it by myself without reading up anything. If it’s a large area, then I try to put cardbox and then put in more soil
This would almost make me think of spring- until I look again out my window! I think we will take much joy from spring when it does finally arrive.
I think the tip about placing sod in bare places around the yard worked well for me, and I also used to pile some up (upside down) to rot. Nowadays I am not making as many new beds.
We had a very bare septic field we needed to cover. For some reason the grass we sowed there didn’t take too well. Spring is coming, Ilona. Hang on tight!
I am so jealous that you have a nearby source of well-rotted manure! How fabulous! Unless you’re downwind of said composting . . . ha ha. I remember learning in a college hort class that you don’t need to dig the compost into the soil, so I just throw it on top as well. The rumor is that the developer of our neighborhood scraped off the topsoil to sell before building houses, so I have a long road of soil improvement ahead. Thank goodness my husband will haul compost for me each spring.
Larry has been working hard to make more compost for us the last few years, but it mostly ends up on the vegetable garden. he thinks food is more important than flowers – crazy talk!
What I do, if I have a lot of plants to get in the ground is to just amend the soil where I am putting each plant, rather than the whole bed. I mix the amendments in my wheelbarrow, and continually mix the soil excavated from each planting hole in with it, then return it back around the plant. Takes a lot less compost and what have you than covering the whole bed, though I admit in the end it is probably more work.
I also save cardboard all year to put under my mulch which saves me time because it takes much longer for any weeds to get through.
It is true that vegetables, being annuals, require a rich soil to do well. If you are growing them for food, it is smart to put your resources there. In established beds I do as you do, Donalyn, and just amend the planting hole. But for planting beds I am just creating, I like to replace all that sod I just removed with something.
That manure does look like some good stuff to have 🙂 I can think of a dozen spots around here that could use a truckful or two!
I’m with you on the low work methods. I sometimes feel guilty about “cutting corners” but like you I find the plants really don’t seem to mind all that much, and I can always think of better things to spend my time on.
Kathy, I saw this on Pinterest and had to stop by to read the whole story. I’m planning on making at least one new bed this spring (wish I had prepped it in autumn, though) and want to find the easiest way possible to do it. I gave up double-digging after one bed and have gone to lasagna gardening. But this sounds even better…now if only I can find a willing teenager:)
Our local landscape recycling center has great compost, and it’s cheap. I don’t have a a truck, but I stop by once in awhile and fill up every container I can load into the back of my small SUV. They’ll also deliver, which is worth it if you have a lot of garden to cover.
Rose (and Deborah), I don’t know what to tell you about finding help. They don’t have to be teenagers, of course. Anyone with a strong back will do. I am thankful my teens are willing to help without too much grousing.
This is great advice; I had to abandon plans to prep a new bed last year because I ran out of time and energy; if I had gone this route, I bet it would have gotten done.
I’ll be giving this a try this spring, assuming it ever warms up enough to garden again!
Like Betsy, I sometimes find it a challenge to find a good source for mulch or composted manure. But the REAL challenge is to find that teenage boy, especially one who has been taught by his dad how to remove sod (or anything else). I’m afraid you’ve got us all beat there, Kathy, with your home-grown crew.
That’s similar to what I’ve done, though I cleared off the sod myself. I found it helped to cut the grass as short as possible before digging it out.
Yes, and it helps a lot if you have good soil to start with, too, which I know you do.
What is a mattock?
I have had fun collecting old jack o lanterns and ground up leaves to make “lasagne”. It does take more patience than I have right now.
I guess what we call a mattock is more specifically a Pick Mattock . The boys use the broad blade to remove sod.
This was great! I loved the step by step process, and I think you’re garden is going to thrive come spring.
I especially liked that you pointed out that you have to keep taking care of the bed even after you’ve planted. The work is nonstop! (Though it is fun work…)
Loved this post, Kathy. But not having a horse breeder down the road, what can I use for fill? Any suggestions?
Betsy, I agree that finding a plentiful source of organic matter can be a challenge, especially if you tend to keep to yourself or don’t have easy access to a pickup truck. At our old house the county landfill composted all the yard waste (leaves, etc.) that the municipalities collected and offered it free to those willing to shovel it into their truck. You could check to see if there is a program like that near you. That is what I used before I discovered this horse breeder. (He made it easy to be discovered–had a big piece of plywood with the words Garden Gold spray-painted on it propped in front of the pile in easy sight of the road.) I have to admit I only developed this method after my oldest son bought a truck. Before that I was limited to the compost I could generate from my own garden and kitchen waste and there was never enough to go around.
Glad to brighten your day, Kathy.
Wow, you have got your process down! I have used newspaper and cardboard topped with compost (if I have) and mulch in my own garden but always “cut” an edge to define the bed. It seems to help to edge the area. I certainly see the value in hiring someone to do the sod removal! I am getting rid of my entire lawn one day. Love seeing your progress and all that nice dark organic matter without snow cover!